Go to ECE392 Experiment | 1 | 2 | 3 | 5 | 6 | 7 | 8 | Lab manuals | ECE Lab home
![]()
|
|
Go to ECE392 Experiment | 1 | 2 | 3 | 5 | 6 | 7 | 8 | Lab manuals | ECE Lab home |
|
ECE 392 - Electrical Engineering Laboratory II
EXPERIMENT IV
OPERATIONAL AMPLIFIER BASICS
OBJECTIVES
Familiarity with operational amplifiers (op-amps) and basic op-amp circuits: inverting, non-inverting, and summing amplifiers. Input and output impedances of op-amp circuits.
INTRODUCTION
Operational amplifiers (so called Op-Amps) are analog devices made in the form of integrated circuits containing tens of transistors with well matched elements designed to achieve desired performance parameters. The come in a variety of packages, often in multiple units, and range in price from a fraction of a dollar to tens of dollars for special precision amplifiers. They are easy to use and very handy in many applications. If you need to process analog signals you will most likely use Op-Amps rather than discrete transistors.
Analog op-amp circuits operate always with negative feedback accomplished by a connection between the output and the negative input. Output voltage is kept below saturation i.e. between a couple of volts below the positive supply voltage and a couple of volts above the negative (or zero) power supply voltage. First order analysis of op-amp circuits can be made with two simple rules: ( 1 ) the voltage between the negative and the positive inputs is zero and ( 2 ) the inputs draw no current
PRELAB
Draw schematic diagrams of an inverting, a non-inverting, and a summing operational amplifiers. Express relation between output and input as functions of the values of resistors used in the circuits. What are input impedances of these circuits?
References:
T. C. Hayes and P. Horowitz "Student Manual for The Art of Electronics", pp. 175- 179.
S. Franco "Design with Operational Amplifiers and Analog Integrated Circuits", McGraw-Hill 1988. Chapter 1.
LABORATORY
Equipment needed from the stockroom: scope probe, resistance substitution box, leads.
1. INVERTING AMPLIFIER
a. Using an op-amp in your parts kit wire an inverting amplifier.
Supply the op-amp with ± 15 V from the power supply at your bench (do not forget to connect power supply "ground" to the circuit board). Choose two sets of resistors in the circuit to obtain two different gain values, between five and a hundred. Measure the resistors with a digital ohmmeter. Measure dc and ac gains (at about 1 kHz) and compare them with the values calculated from the known resistors in the circuit. Do not drive the op-amp output to saturation.
b. Determine input impedance (resistance) of the two amplifiers.
Measure voltage at the two ends of the input resistor. A voltage drop on the resistor indicates current flowing to the circuit through its internal resistance.
c. Estimate output impedance of the two amplifiers
Load the output with a known resistor and measure the change it makes in the output voltage. Since you expect that op-amp has low output impedance, use low resistance for your load (e.g. 100 ohms). Remember, however, that the circuit is not designed to draw large current. Keep it below 10 mA by limiting output voltage in these measurements. You may not be able to measure the small value of the output impedance precisely but at least try to estimate its order of magnitude.
2. NONINVERTING AMPLIFIER
Assemble a non-inverting amplifier with a gain below 100. Check if gain agrees with the values of resistors in the circuit. Estimate its output impedance, as in 1c.
What input impedance you expect this circuit may have? Try to measure the input impedance (as in 1b) by attaching a large (1 M) series resistor at the input. What are your conclusions?
Next, remove the resistors and connect the output of the op-amp to its negative input with a wire. Measure the gain. What is the name of this circuit and what is it good for?
3. SUMMING AMPLIFIER
Build a two input summing amplifier with equal gain on both inputs. First test it with a signal from a waveform generator on one input and a d.c. voltage from a power supply on the other. Next use two sinewaves; one on each input, and observe interesting effects of adding two waves. (Check out second generator from the stock-room.)
Consider trigonometric identity:
The above equation says that adding two sinewaves of the same amplitude and frequency gives a sinewave of the same frequency and the double amplitude. This seems obvious but try to prove it experimentally. Really interesting things happen when the two waves have almost but not quite the same frequency. You should be able to observe a low frequency modulation of the wave with the higher frequency, equal to the mean frequency of the input waves. This interference phenomenon is also important in analog to digital conversion. When a sampling frequency is not high enough (too close to the frequency of the sampled waveform), frequencies that were not present in the original analog signal appear in the digitized signal (so called aliasing).
To observe interference of two sinewaves make sure that each generator gives you the same amplitude at the amplifier output. If the gains on the two inputs are not the same you may compensate by adjusting amplitudes on the generators. Set both generators frequencies approximately to the same value. Fine tune one of the generators while observing the scope. Note and explain your observations. The experiment is easier at low frequency, 1 kHz or even 100 Hz or below.
4. AN EXAMPLE OF OP-AMP CIRCUITS: CURRENT TO VOLTAGE CONVERTER
Using the rules of op-amp circuit design, given in the introduction to these experiments, it is easy to see that the voltage at the output of the circuit below is equal to the input current multiplied by the resistance R. The negative input is at ground (the same potential as the positive input -rule 1) and current I has no place to go (rule 2) but through R. By choosing the resistor value one can obtain a desired conversion of current into voltage shown by the meter.
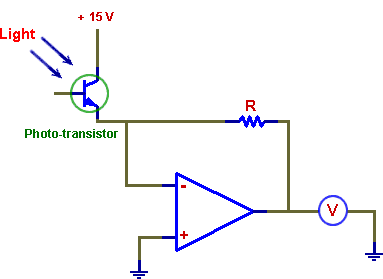
The circuit can be used as an "ideal ammeter", i.e. the ammeter without internal resistance, if one needs to measure currents flowing to ground. This is because the ammeter terminals will be always at ground, no matter what the current is (within the op-amp specs). The voltmeter need not be ideal; even if it has quite low resistance (rather than infinite resistance for the ideal one) the low output impedance of the op-amp will not cause much voltage drop. In the example above, a photo-transistor is connected at the input. Instead of the base current, photons of light control the collector current of this BJT transistor which behaves like a current source, with current dependent on the light intensity. The circuit is thus a sensitive light meter which could be used, for example, in low-level light photography.
Assemble and test the performance of the light meter circuit. If you use a phototransistor, the resistor R should be of the order of 100k, larger if you use a photodiode. You may substitute a light sensor for another current generating device if you wish to experiment.
REPORT
Include all schematic and results. Compare measured and calculated amplifier gains. Describe and comment on your test of one of the circuit in the last section.
|
|
Go to ECE392 Experiment | 1 | 2 | 3 | 5 | 6 | 7 | 8 | Lab manuals | ECE Lab home |
|
