Go to EE495 Experiment | 1 | 2 | 3 | 4 | 5 | 6 | 8 | 9 | 10 | 11 | 12 | 13 | 14 | ECE Lab home
![]()
|
Go to EE495 Experiment | 1 | 2 | 3 | 4 | 5 | 6 | 8 | 9 | 10 | 11 | 12 | 13 | 14 | ECE Lab home |
|
EE 495 Communications Systems Laboratory
Experiment 7: PRBS GENERATION
ACHIEVEMENTS: Introduction to the pseudo random binary sequence (PRBS) generator; time domain viewing: snap shot and eye patterns; two generator synchronization and alignment with the 'sliding window correlator'
PREREQUISITES: None
EXTRA
MODULES: A second SEQUENCE GENERATOR, ERROR COUNTING
UTILITIES.
In analog work the standard test message is the sine wave, followed by the two-tone signal for more rigorous tests. The property being optimized is generally signal- to-noise ratio (SNR). Speech is interesting, but does not lend itself easily to mathematical analysis, or measurement.
In digital work a binary sequence, with a known pattern of '1' and '0', is common. It is more common to measure bit error rates (BER) than SNR, and this is simplified by the fact that known binary sequences are easy to generate and reproduce.
A common sequence is the pseudo random binary sequence:
The output from a pseudo random binary sequence generator is a bit stream of binary pulses; i.e.., a sequence of 1's (HI) or 0' s (LO), of a known and reproducible pattern.
The bit rate, or number of bits per second. is determined by the frequency of an external clock, which is used to drive the generator. For each clock period a single bit is emitted from the generator; either at the '1' or '0' level, and of a width equal to the clock period. For this reason the external clock is referred to as a bit clock.
For a long sequence the 1's and O's are distributed in a (pseudo) random manner.
The sequence pattern repeats after a defined number of clock periods. In a typical generator the length of the sequence may be set to 2n clock periods, where n is an integer. In the TIMS SEQUENCE GENERATOR (which provides two, independent sequences, X and Y) the value of n may be switched to one of three values, namely 2, 5, or 11. There are two switch positions for the case n = 5, giving different patterns. The SYNCH output provides a reference pulse generated once per sequence repetition period.
This is the start-of-sequence pulse. It is invaluable as a trigger source for an oscilloscope.
There are two important methods of viewing a sequence in the time domain.
The snapshot
A short section, about 16 clock periods of a TTL sequence, is illustrated in Figure 1 below.
Figure 1: A sequence of length 16 bits
Suppose the output of the generator which produced the TTL sequence, of which this is a part, was viewed with an oscilloscope, with the horizontal sweep triggered by the display itself.
The display will not be that of Figure I above! Of course not, for how would the oscilloscope know which section of the display was wanted ?
Consider just what the oscilloscope might show!
Specific sections of a sequence can be displayed on a general purpose oscilloscope, but the sequence generator needs to provide some help to do this.
As stated above, it gives a start-of-sequence pulse at the beginning of the sequence. This can be used to start (trigger) the oscilloscope sweep. At the end of the sweep the oscilloscope will wait until the next start-of-sequence is received before being triggered to give the next sweep.
Thus the beginning 'n' bits of the sequence are displayed, where 'n' is determined by the sweep speed.
For a sequence length of many-times-n bits, there would be a long delay between sweeps. The persistence of the screen of a general purpose oscilloscope would be too short to show a steady display, so it will blink. You wi1l see the effect during the experiment.
A long sequence is useful for examining 'eye patterns'. These are defined and examined in the experiment entitled Eye patterns in this Volume.
One important application of the PRBS is for supplying a known binary sequence. This is used as a test signal (message) when making bit error rate (BER) measurements.
For this purpose a perfect copy of the transmitted sequence is
required at the receiver, for direct comparison with the received sequence.
This perfect copy is obtained from a second, identical, PRBS generator.
The second generator requires:
Bit clock information, so
that it runs at the same rate as the first
A method of aligning its output sequence with the received sequence. Due to transmission through a bandlimited channel, it will be delayed in time with respect to the sequence at the transmitter.
In a laboratory environment it is a simple matter to use a 'stolen carrier' for bit clock synchronization purposes, and this will be done in most TIMS experiments. In commercial practice this bit clock must be regenerated from the received signal. Methods of bit clock recovery are investigated in a later experiment.
Examine a SEQUENCE GENERATOR module, and read about it in the TIMS User Manual.
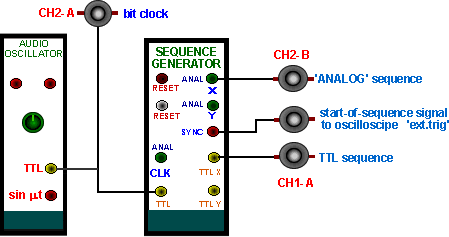
A suitable arrangement for the examination of a SEQUENCE GENERATOR is illustrated in Figure 2.
Notice that the length of the sequence is controlled by the settings of a DIP switch. SW2, located on the circuit board. See the Appendix to this experiment for details.
 |
|
Figure 2: examination of a SEQUENCE GENERATOR |
T1 Before inserting the SEQUENCE GENERATOR set the on-board DIP switch SW2 to generate a short sequence. Then patch up the model of Figure 2 above. Set the AUDIO OSCILLATOR, acting as the bit clock, to about 2 kHz. Set the oscilloscope sweep speed to suit; say about 1 ms/cm.
T2
Observe the TTL sequence on CH1-A. Try triggering the oscilloscope to the sequence
itself (CH1-A). Notice that you may be able to obtain a stable picture, but
it may change when the re-set button is pressed (this re-starts the sequence
each time from the same point, referred to as the 'start of sequence').
T3
Try triggering off the bit clock. Notice that it is difficult (impossible
? ) to obtain a stable display of the sequence.
T4
Change the mode of oscilloscope triggering. Instead of using the signal itself,
use the start-of-sequence SYNC signal from the SEQUENCE GENERATOR, connected
to 'ext. trig' of the oscilloscope. Reproduce the type of display of
Figure 1 (CH1-A ).
T5
Increase the sequence length by re-setting the on-board
switch SW2. Re- establish synchronization using the start-of-sequence SYNC signal
connected to the 'ext. trig' of the oscilloscope. Notice the
effect upon the display. See Tutorial Question Q8.
T6
Have a look with your oscilloscope at a yellow analog output from
the SEQUENCE GENERATOR. The DC offset has been removed, and the amplitude is
now suitable for processing by analog modules (eg., by a filter representing
an analog channel -see the experiment entitled The noisy channel model in this
Volume). Observe also that the polarity has been reversed with respect to the
TTL version. This is just a consequence of the internal circuitry; if
not noticed it can cause misunderstandings !
The displays you have seen on the oscilloscope are probably as you would have expected them to be ! That is, either 'HI' or 'LO' with sharp, almost invisible, transitions between them. This implies that there was no band limiting between the signal and the viewing instrument.
If transmitted via a lowpass filter, which could represent a bandlimited (baseband) channel, then there will be some modification of the shape, as viewed in the time domain.
For this part of the experiment you will use a TUNABLE LPF to limit, and vary, the bandwidth. Because the sequence will be going to an analog module it will be necessary to select an 'analog' output from the SEQUENCE GENERATOR
T7 Select a short sequence from the SEQUENCE GENERATOR
T8
Connect an analog version of the sequence (YELLOW) to the input of a TUNABLE LP F.
T9
On the front panel of the TUNABLE LPF set the toggle switch to the
WIDE position. Obtain the widest bandwidth by rotating the TUNE control fully
clockwise.
T10
With the oscilloscope still triggered by the 'start-of-sequence' SYNC signal,
observe both the filter input and output on separate oscilloscope channels.
Adjust the gain control on the TUNABLE LPF so the amplitudes are approximately
equal.
T11
Monitor the filter corner frequency, by measuring the CLK signal from the TUNABLE
LPF with the FREQUENCY COUNTER*(divide
by 880(normal) or 360 (wide) for details see TIMS User Manual). Slowly reduce the bandwidth, and compare
the difference between the two displays.
Notice that, with reducing bandwidth:
a) Identification of individual bits becomes more difficult
b) There is an increasing delay between input and output
Remember that the characteristics of the filter will influence the results of the last Task.
In an experiment entitled BER measurement in the noisy channel (within Volume D2 -Further & Advanced Digital Experiments) you will find out why it is important to be able to align two sequences. In this experiment you will find out how to do it.
Two SEQUENCE GENERATOR modules may be coupled so that they deliver two identical, aligned, sequences.
That they should deliver the same sequence it is sufficient that the generator circuitry be identical
That they be at the same rate it is necessary that they share a common bit clock
That they be aligned requires that they start at the same time.
TIMS SEQUENCE GENERATOR modules (and those available commercially) have in built
facilities to simplify the alignment operation. One method will be examined
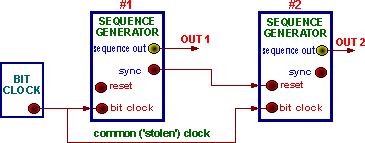
with the scheme illustrated in block diagram form in Figure 3 below.
 |
| Figure 3: aligning two identical generators |
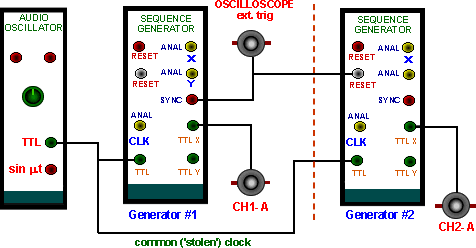
The scheme of Figure 3 is shown modeled with TIMS in Figure 4 below.
 |
| Figure 4: TIMS model of the block diagram of Figure 3. |
You will now investigate the
scheme. Selecting short sequences will greatly assist during the setting-up
procedures, by making the viewing of sequences on the oscilloscope much easier.
T12 Before plugging in the SEQUENCE GENERATOR modules, set them both to the same short sequence.
T13
Patch together as above, but omit the link from the 'GENERATOR #1 SYNC
to 'GENERATOR #2' RESET. Do not forget
to connect the 'start-of- sequence' SYNC signal of the GENERATOR #1
to the 'ext. trig' of the oscilloscope.
T14
Press the 'GENERATOR
#2' RESET
push button several times. Observe on the oscilloscope that the two output sequences
are synchronized in time but the data bits do not line-up correctly. Try to
synchronize the sequences manually by repeating this exercise many times. It
is a hit- and-miss operation, and is likely to be successful only irregularly.
T15
Connect the SYNC of the 'GENERATOR #1' to the RESET of
the 'GENERATOR
#2'. Observe on the oscilloscope that the
two output sequences are now synchronized in time and their data are aligned.
T16
Break the synchronizing path between the two generators. What happens to the
alignment ?
Once the two generator are aligned, they will remain aligned, even after the alignment link between them is broken. The bit clock will keep them in step
The above scheme has demonstrated a method of aligning two generators, and was seen to perform satisfactorily. But it was in a somewhat over simplified environment.
What if the two generators had been separated some distance, with the result that there was a delay between sending the SYNC pulse from GENERATOR #1 and its reception at GENERATOR #2?
The sequences would be offset by the time delay
In other words, the sequences would not be aligned.
In the previous section two PRBS generators were synchronized in what might be called a 'local ' situation. There were two signal paths between them:
One connection for the bit clock
Another connection for the st3;rt-of-sequence command
Consider a transmitter and a receiver separated by a transmission medium. Then:
1. There would be an inevitable transmission time delay
2. The two signal paths are not conveniently available
It may be difficult (impossible?)
to align the two generators, at remote sites. But it is possible, and frequently
required, that a local generator can be aligned with a received sequence
(from a similar generator).
The sliding window correlator is an example of an arrangement which can achieve this end.
Consider the arrangement shown in block diagram form in Figure 5 below.
Figure 5 -the sliding window correlator
The detector is present to re-generate TTL pulses from the bandlimited received signal. We will assume this regeneration is successful.The regenerated received sequence (which matches, but is a delayed version of the transmitted sequence) is connected to one input of a clocked X-OR logic gate.
The receiver PRES generator (using a stolen bit clock in the example) is set to generate the same sequence as its counterpart at the transmitter. Its output is connected to the other input of the clocked X-OR gate. The clock ensures that the comparison is made at an appropriate instant within a bit clock period.
At each bit clock period there is an output from the X-OR gate only if the bits differ. In this case the receiver generator will be RESET to the beginning of the sequence.
This resetting will take place repeatedly until there are no errors. Thus every bit must be aligned. There will then be no further output from the X-OR gate.
Once alignment has been achieved , it will be maintained even when the RESET signal to the receiver generator is broken
It is the common bit clock which maintains the alignment. Because of the nature of this X-OR comparison technique the arrangement is called a sliding window correlator.
You will now model the block diagram of Figure 5. In later experiments you will meet the CHANNEL and the DETECTOR , but in this experiment we will omit them both. Thus there will in fact be no delay, but that does not in any way influence the operation of the sliding window correlator.
The patching arrangement to model Figure 5 is shown in Figure 6 below.
This model will regenerate, at the receiver, an identical sequence to that sent from the transmitter. To avoid additional complications a stolen carrier is used.
Figure 6: modeling the sliding window correlator
T17 Before patching up select the shortest length sequence on each SEQUENCE GENERATOR
T18
Patch together as above. Do not close the link .from the X-OR output of the
ERROR COUNTING UTILITIES module to the RESET of the RECEIVER
GENERATOR.
T19
View CH1-A and CH2-A simultaneously.
The two
output sequences are synchronized in time but the data bits are probably not
aligned. Press the RESET push button of the RECEIVER GENERATOR repeatedly.
Notice that once in a while it is possible to achieve alignment. With a longer
sequence this would be a rare event indeed.
T20
Switch to CH1-B; observe the error sequence produced by the X-OR operation on
the two data sequences.
T21
Now close the alignment link by connecting
the error signal at the X-OR output to the RESET input of the RECEIVER GENERATOR
T22
Confirm that the error sequence is now zero. Confirm that, if the RESET push
button of the RECEIVER GENERATOR is repeatedly pressed, the error signal appears
for a short time and then disappears.
T23
Repeat the previous Task with a long sequence. Note that the system takes
a longer time to acquire alignment.
T24 Having
achieved alignment, disconnect the error signal from the RESET input
of the RECEIVER GENERATOR, and observe that the two sequences
remain in alignment.
Future experiments will assume familiarity with the operation of the SEQUENCE GENERATOR and the alignment of two sequences using the sliding window correlator. So, before you finish this experiment, make sure you have looked at as many aspects of this arrangement as you have time for.
Q1 You have seen the first 'n ' bits of a sequence, using the start-of-sequence signal to initiate the oscilloscope sweep. How could you show the next 'n ' bits of the same sequence ? Can you demonstrate your method with TIMS ?
Q2 Estimate the bandwidth of the sequence as a function of bit rate clock frequency. Describe a method for estimating the maximum rate at which a binary sequence can be transmitted through a lowpass filter. Relate its predictions with your observations.
Q3 Explain what is meant when two sequences are 'synchronized' and 'aligned
Q4 Was there any obvious misalignment between the TTL sequence input to, and the band limited sequence output from, the TUNABLE LPF ? Explain.
Q5 In the last model examined; explain why the sequence alignment takes longer when the sequence length is increased
Q6 Suppose the TIMS SEQUENCE GENERATOR is driven by an 8.333 kHz TTL clock. What would the TIMS FREQUENCY COUNTER read if connected to the output sequence ? Explain.
Q7 What should an rms meter read if connected to a TTL pseudo random binary sequence ?
Q8 With a 2.083 kHz clock what is the delay, for a 2048 bit sequence, between consecutive displays ?
Top |
|
Go to EE495 Experiment | 1 | 2 | 3 | 4 | 5 | 6 | 8 | 9 | 10 | 11 | 12 | 13 | 14 | ECE Lab home |
|