Go to ECE489 Experiment | 1 | 2 | 3 | 4 | 5 | 6 | 7 | 9 | 10 | 11 | 12 | 13 | 14 | ECE Lab home
![]()
|
|
Go to ECE489 Experiment | 1 | 2 | 3 | 4 | 5 | 6 | 7 | 9 | 10 | 11 | 12 | 13 | 14 | ECE Lab home |
|
ECE 489 Communications Systems Laboratory
Experiment 8: EYE PATTERNS
ACHIEVEMENTS: Understanding the Nyquist I criterion,. transmission rates via band limited channels; comparison of the 'snap shot' display with the 'eye patterns '.
PREREQUISITES: Some acquaintance with basic notions of digital transmission
ADVANCED MODULES: BASEBAND CHANNEL FILTERS
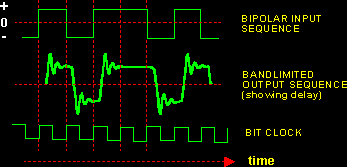
It is well known that, when a signal passes via a bandlimited channel it will suffer waveform distortion. As an example, refer to Figure I. As the data rate increases the waveform distortion increases, until transmission becomes impossible.
|
|
|
Figure I: waveforms before and after moderate bandlimiting |
In this experiment you will be
introduced to some important aspects of pulse transmission which are relevant
to digital and data communication applications.
Issues of interest include:
In the 1920s Harry Nyquist proposed a clever method now known as Nyquist's first criterion, that makes possible the transmission of telegraphic signals over channels with limited bandwidth without degrading signal quality .This idea has withstood the test of time. It is very useful for digital and data communications.
|
|
In practical
communication channels distortion causes the dislocation of the zero crossings
of Nyquist pulses, and results in intersymbol interference (ISI)
I. Eye patterns provide a practical and very convenient method of assessing
the extent of ISI degradation. A major advantage of eye patterns is that
they can be used 'on-line' in real-time. There is no need to interrupt normal
system operation.
The effect
of ISI becomes apparent at the receiver when the incoming signal has to
be 'read' and decoded; i.e.., a detector decides whether the value at a certain
time instant is, say, 'HI' or 'LO' (in a
binary decision situation). A decision error may occur as a result of noise.
Even though ISI may not itself cause an error in the absence of noise, it
is nevertheless undesirable because it decreases the margin relative to
the decision threshold, i.e.., a given level of noise, that may be harmless
in the absence if ISI, may lead to a high error rate when ISI is present.
Another issue of importance in the decision process is timing jitter. Even if there is no ISI at the nominal decision instant, timing jitter in the reconstituted bit clock results in decisions being made too early or too late relative to the ideal point. As you will discover in this experiment. channels that are highly bandwidth efficient are more sensitive to timing jitter.
Maximum transmission rate assessment
This is what is going to be done:
First, set up a pseudorandom sequence. To start you will use the shortest available sequence, so that you can easily observe it with an oscilloscope. Very long sequences are not easy to observe because the time elapsed between trigger pulses is too long. The oscilloscope will be triggered to the start of sequence signal. The display has been defined as a 'snap shot'.
Next you will pass this sequence through a selection of filters. Three are available in the BASEBAND CHANNEL FILTERS module, and a fourth will be the TUNABLE LPF module. You will observe the effect of the filters on the shape of the sequence, at various pulse rates.
Then the above observations will be repeated, but this time the oscilloscope will be triggered by the bit clock. giving what is defined as an eye pattern.
Finally you will compare the performance of the various cases in terms of achievable transmission rate and 'eye opening'.
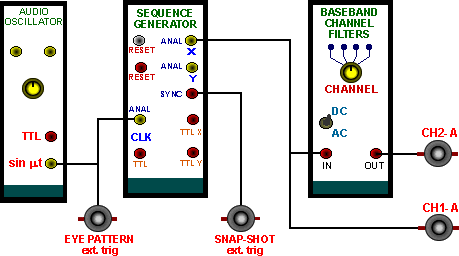
T1 Set up the model of Figure 2. The AUDIO OSCILLATOR serves as the bit clock for the SEQUENCE GENERATOR. A convenient rate to start with is 2 kHz. Select CHANNEL # I. Select a short sequence (both toggles of the on-board switch SW2 Up)
|
|
|
Figure 2: viewing snap shots and eye patterns |
T2 Synchronize the oscilloscope to the 'start-of-sequence ' synchronizing signal from the SEQUENCE GENERATOR Set the sweep speed to display between 10 and 20 sequence pulses (say 1 ms/cm). This is the 'snap shot' mode. Both traces should be displaying the same-picture, since CHANNEL #1 is a 'straight through' connection.
The remaining three channels (#2, #3, and #4) in the BASEBAND CHANNEL FILTERS module represent channels having the same slot bandwidth ( 40 db stopband attenuation at 4 kHz), but otherwise different transmission characteristics, and, in particular, different 3 dB frequencies. Graphs of these characteristics are shown in Appendix A.
You should also prepare a TUNABLE LPF to use as a fourth channel, giving it a 40 dB attenuation at 4 kHz. To do this:
T3 Using a sinusoidal output from an AUDIO OSCILLATOR as a test input:
Set the TUNE and GAIN controls of the TUNABLE LPF fully clockwise. Select the NORM bandwidth mode.
Set the AUDIO OSCILLATOR to a frequency of, say, 1 kHz. This is well within the current filter passband.
Note the output amplitude on the oscilloscope.
Increase the frequency of the AUDIO OSCILLATOR to 4 kHz.
Reduce the bandwidth of the TUNABLE LPF (rotate the TUNE control anti-clockwise) until the output amplitude falls 100 times. This is a 40 dB reduction relative to the passband gain.
Now it is your task to make an assessment of the maximum rate, controlled by the frequency of the AUDIO OSCILLATOR, at which a sequence of pulses can be transmitted through each filter before they suffer unacceptable distortion. The criterion for judging the maximum possible pulse rate will be your opinion that you can recognize the output sequence as being similar to that at the input.
It is important to remember that the four filters have the same slot bandwidth (i.e.., 4 kHz, where the attenuation is 40 dB) but different 3 dB bandwidths.
To relate the situation to a practical communication system you should consider the filters to represent the total of all the filtering effects at various Stages of the transmission chain, i.e.., transmitter, channel, and the receiver right up to the input of the decision device.
T4 Record your assessment of the maximum practical data rate through each of the four channels.
At the very least your report will be a record of the four maximum transmission rates. But it is also interesting to compare these rates with the characteristics of the filters. Perhaps you might expect the filter with the widest passband to provide the highest acceptable transmission rate ?
Now you will repeat the previous exercise, but, instead of observing the sequence as a single trace, you will use eye patterns, The set-up will remain the same except for the oscilloscope usage and sequence length.
So far you have used a short sequence, since this was convenient for the snapshot display. But for eye pattern displays a longer sequence is preferable, since this generates a greater number of patterns. Try it.
T5
Change the oscilloscope synchronizing signal from the start-of-sequence SYNC
output of the SEQUENCE GENERATOR to the sequence bit clock. Increase the sequence
length (both toggles of the on-board switch SW2 DOWN). Make sure the oscilloscope
is set to pass DC. Why ? Try AC coupling, and see if you notice any difference.
T6
Select CHANNEL #2. Use a data rate of about 2 kHz. You should
have a display on CH2-A similar to that of Figure 3 below.
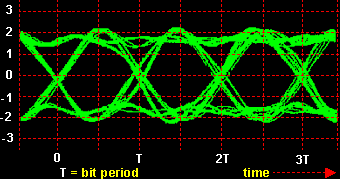 |
| Figure 3: a 'good' eye pattern |
T7 Increase the data rate until the eye starts to close. Figure 4 shows an eye not nearly as clearly defined as that of Figure 3.
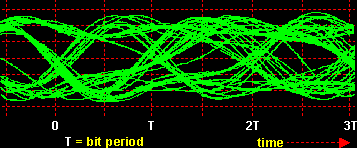 |
| Figure 4: compare with Figure 3; a faster data rate |
T8 Take some time to examine the display, and consider what it is you are looking at! There is one 'eye' per bit period. Those shown in Figure 3 are considered to be 'wide open'. But as the data rate increases the eye begins to close.
The actual shape of an eye is determined (in a linear system) primarily by the filter (channel) amplitude and phase characteristics (for a given input waveform).
Timing jitter will have an influence too. See the experiment entitled Bit clock regeneration (within Volume D2 -Further & Advanced Digital Experiments).
The detector must make a decision, at an appropriate moment in the bit period, as to whether or not the signal is above or below a certain voltage level. If above it decides the current bit is a HI, otherwise a LO. By studying the eye you can make that decision. Should it not be made at the point where the eye is wide open, clear of any trace ? The moment when the vertical opening is largest ?
You can judge, by the thickness of the bunch of traces at the top and bottom of the eye, compared with the vertical opening, the degree-of-difficulty in making this decision.
T9
Determine the highest data rate for which you consider you would always
be able to make the correct decision (HI or LO). Note that the
actual moment to make the decision will be the same for all bits, and relatively
easy to distinguish. Record this rate for each of the four filters.
You have now seen two different displays, the snapshot and the eye pattern.
It is generally accepted that the eye pattern gives a better indication of the appropriate instant the HI or LO decision should be made, and its probable success, than does the snapshot display. Do you agree?
Noise and other impairments will produce the occasional transition which will produce a trace within the apparently trace-free eye. This may not be visible on the oscilloscope, but will none-the-less cause an error. Turning up the oscilloscope brilliance may reveal some of these transitions.
Such a trace is present in the eye pattern of Figure 4.
An oscilloscope, with storage and other features (including in-built signal analysis !), will reveal even more information.
It does not follow that the degradation of the eye worsens as the clock rate is increased. Filters can be designed for optimum performance at a specific clock rate, and performance can degrade if the clock rate is increased or reduced.
The present experiment was aimed at giving you a 'feel' and appreciation of the technique in a non-quantitative manner.
In later experiments you will make quantitative measurements of error rates, as data is transmitted through these filters, with added noise.
Theory predicts a maximum transmission rate of 2 pulses per Hz of baseband bandwidth available. On the basis of your results, what do you think ?
Q1 Explain why it is important to have the oscilloscope switched to 'DC ' when viewing eye patterns. Explain the meaning, and possible causes of, 'baseline wander "
Q2
Why have the filters in the BASEBAND CHANNEL FILTERS module got common slotband
widths (instead, for example, of having common passband widths} ?
Q3 Why would a storage oscilloscope provide a more reliable eye pattern
display ?
Q4 Why is a long sequence preferable for eye pattern displays ?
Q5
How would timing jitter show up in an eye pattern ?
|
|
Go to ECE489 Experiment | 1 | 2 | 3 | 4 | 5 | 6 | 7 | 9 | 10 | 11 | 12 | 13 | 14 | ECE Lab home |
|